Use “” and the “is exactly” filter. This video could have been a blogpost. This blogpost could have been a tweet.
That said, this video contains a few extra nuggets that may be of use – how to create a listpage view that filters for blanks. How to use Power Query to report on records with blank values.
Hope you enjoy.
Some Concepts:
Filter for blanks (use “” and “is exactly” filter)
Not sure what to get that special D365 accountant in your life? Waited till the last minute and now you don’t have time to buy a gift? Show your appreciation by passing along this list of journal entry tips. Better yet, send a link to our whole series on shortcuts.
#D365Blogs: the gifts that keeps on giving – even during the holidays.
These example screenshots will be from the general ledger journal form, but are applicable across journal types in D365.
Alt+N – Create a new journal
Alt+N can create a new journal header, and also create new journal lines once the journal lines are opened.
Multiple environments are necessary during ERP implementations. An ERP implementation usually involve at least three environments, though additional environments might be added depending on implementation project requirements. DEV, TEST, and PROD, are the most common names for these three environments
PROD (May also be called GOLD)
After implementation, PROD refers to the live ERP environment. Prior to implementation, this is a transaction-less environment where tested configurations are setup. Transaction-less because ERP systems don’t have a “delete posted transactions” button, so you want to keep this environment clean from test transactions. So where does transaction testing happen?
TEST (May also be called UAT for User Acceptance Testing)
During the implementation, subject matter experts and end-users will setup sample configurations and model business processes with test transactions in the TEST environment. The desired, approved configurations will then be setup in the PROD (GOLD) environment.
DEV (Mostly just called DEV)
DEV environments are necessary as ERP projects frequently require customizations. A developer can build and deploy his developments to the DEV environment without interrupting the flow of user testing. Once any technical bugs are smoothed out, the customized code from the DEV environment can be promoted to the TEST environment, where it will be validated/approved by subject matter experts or other functional users.
A small note for anyone who needs to hear it: If you regularly switch between accounts on the same online services, consider using different browser profiles for your desktop.
Each browser profile will save your cookies and login details separately. This will reduce the hassle of having to regularly sign out of account A to login to account B, or opening an incognito browser and manually re-signing into account B every time you need to do something there.
Some Use Cases:
Switching between Microsoft accounts in different Tenants
Switching between a standard D365 account and a test user account.
Switching from your Twitter main to your burner account to dunk on people who think that Kevin Durant is not as great at basketball as Steph Curry (@KDTrey5 – HMU!)
How To Create Browser Profiles
The process is roughly the same in Edge or Chrome. Click on the circle in the upper right, you can then toggle between existing profiles or create a new profile.
Personalize your Profiles
In your browser settings (click here for Chrome browser settings | click here for Edge browser settings) you can choose unique icons to distinguish your profiles. You can also adjust the appearance (the color of the browser border) to help you easily recognize which browser profile you are using.
Update Profile Icon in EdgeUpdate Profile Appearance in Edge
Pin Browser Profile to Taskbar
This is my favorite feature of using browser profiles. If you have browser windows open for two different profiles, you will notice that there will be two different browser icons in your. Right-click on a particular browser icon and you can pin that browser profile to your taskbar.
Now, the next time you want to work under that profile, you can get there directly from the taskbar icon.
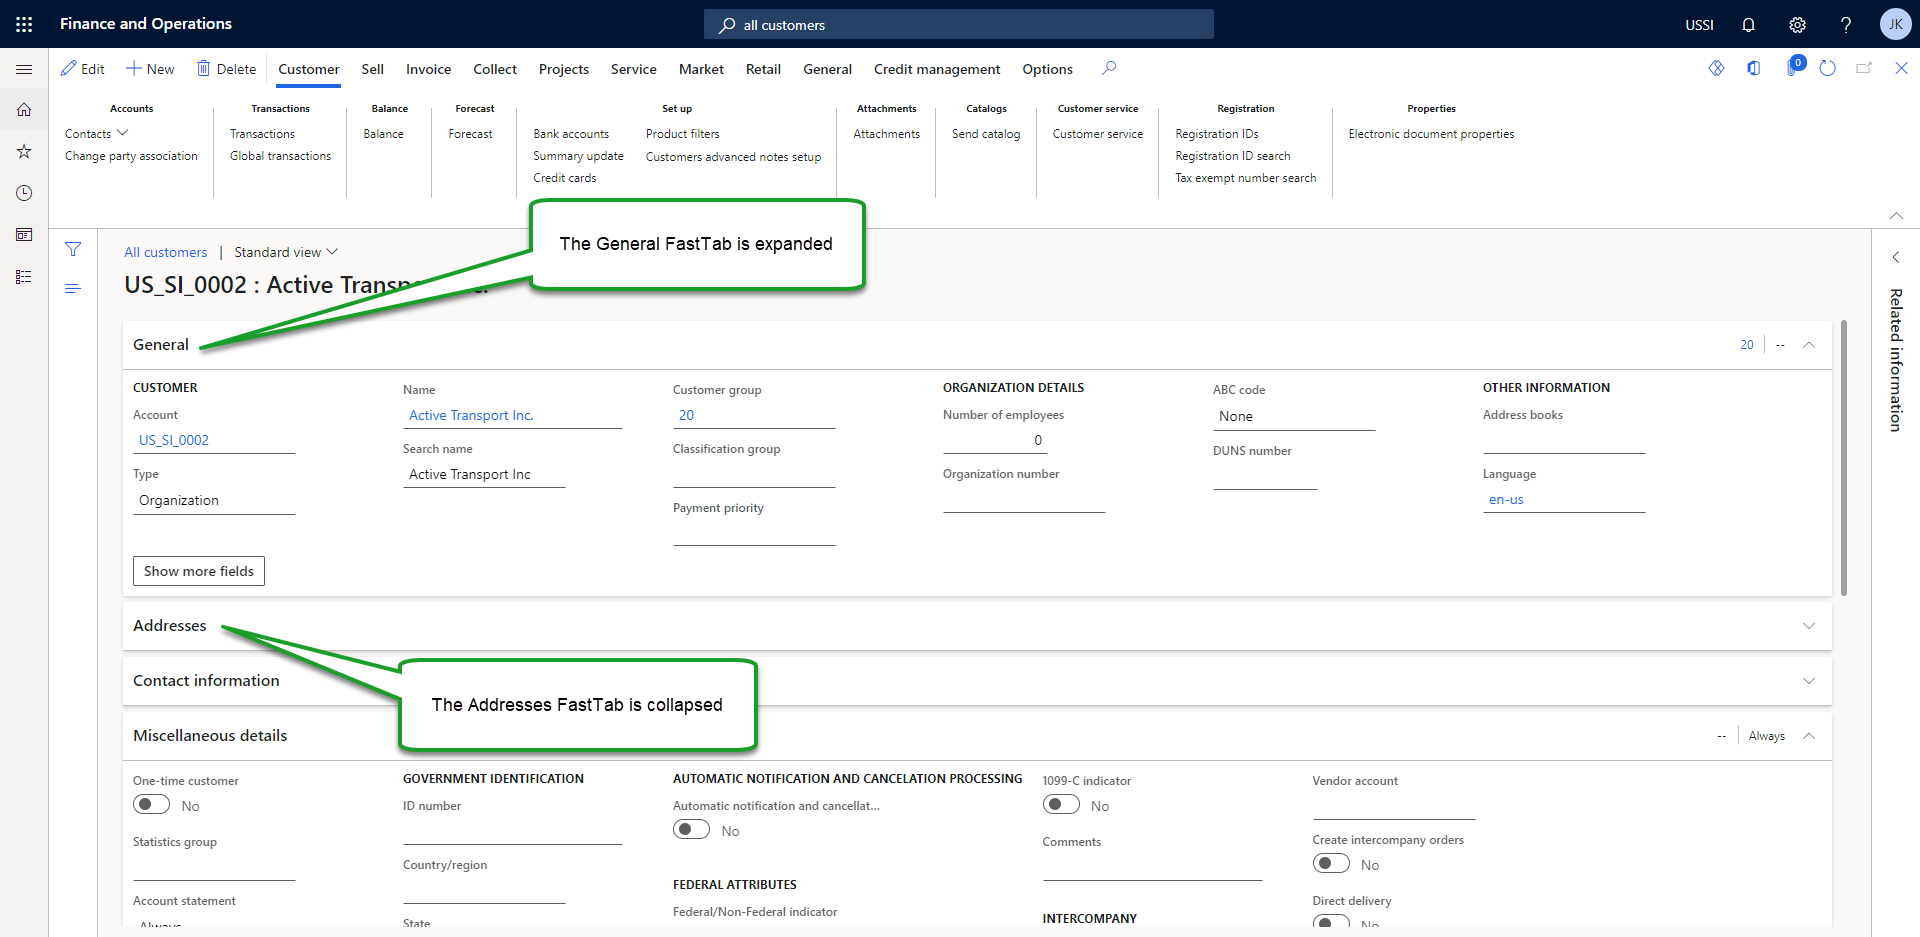
FastTabs are blocks in D365 forms that can be expanded or collapsed. Like a filing cabinet or library card catalog (remember card catalogs?), FastTabs allow lots of information to be compressed into a tiny space and opened for access when needed.
Below are some tips for navigating FastTabs in D365 Finance:
Personalization and Saved Views
If you routinely need access to certain field positioned lower on a form, the Move personalization feature can be used to move the more utilized field into a more prominent FastTab, or even to move an entire FastTab higher on the form.
Right-click and select personalize on a field and you can also select Show in Header, which will display that field attribute on the right side of the FastTab whether the FastTab is expanded or collapsed.
Expand All
If you are looking for a field on a form, but unsure which FastTab it is filed under, Expand all can be your friend. Right-clicking on the fasttab header gives you the option to Expand all FastTabs on the form. Used in conjunction with Ctrl+F, this can be a powerful method to quickly find the field you are searching for.
Less Words, Moar Video
I made a quick video of this. Let me know if this is helpful, and whether you’d like me to make more videos like this.
I don’t know who needs to hear this, but Word is my favorite PDF reader.
Microsoft Edge?
Standard Windows 10 ships with Microsoft Edge as the default PDF reader. It’s nice not having to purchase or download extra PDF reading software, but for me reading a PDF in a web browser does leave something to be desired. First, it’s difficult to markup or edit a PDF in a web browser. Second, I don’t like getting the PDF I’m reading mixed in with all my other open tabs. Third…actually I don’t really have a third – two strikes is enough.
Usually, I read PDFs because they are documents sent to me from a colleague or a customer. I want my open documents grouped with my other open documents (WORD documents), not my endless supply of browser windows.
Make Word Default PDF Reader!
This is actually pretty simple. If you right-click on a PDF, you can choose how to open the file. If word doesn’t appear as an option, you can select choose another app.
From the choose another app screen, if Word does not appear you can find it by clicking more apps. Once selected, you can mark Always use this app to open ..pdf files to set Word as the Default.
As you can see below, setting Word as the default PDF reader creates a slightly different document icon to distinguish between .doc word documents and .pdf PDF documents, though both will be opened in the Word application.
Opening the PDF in Word has the same look and feel of opening a standard word document. As a user, you can make comments or edits like working with a Word document and then save those additions as a new document.
Apparently this functionality has been available since Word 2013. I’m just seven years late to the party. Better late than never, right?
“I took the [road] less traveled by, And that has made all the difference” ~ Robert Frost
In the middle of a twitter thread complaining about how food bloggers always tell long, unrelated stories before finally getting to their recipe, food blogger @DanielleEsposti points out: “Google forces us to provide context so we can rank, so we can get traffic, so we can make ad $$, so we can provide more (free) content. It’s not always as simple as shut up & blog.“
Reading her comment, watching the autumn leaves turn golden brown outside my window, I was reminded of making butternut squash soup with my mother when I was little. It’s a simple recipe, lovingly made. The dish is the right balance of sweet and savory….and all of this is really a ruse to get ranked on “D365 for Butternut Squash Soup“.
Anyways, here’s some D365 content:
Always Open for Editing
D365 forms are either open for editing (in edit mode) or closed for editing (in view mode). When a form is in view mode, it can be opened for editing by clicking the edit button on the top left, or hovering the mouse over any editable field and clicking the pencil icon that appears.
View mode can help prevent accidental record changes, but can also be cumbersome if a user’s role requires them to make frequent form updates. In the Options tab, users can personalize their view of a form by clicking Always open for editing so that the form is in edit mode by default when opened by the user.
Notice that when saved views are enabled, activating Always open for editing creates an asterisk by the view name, reminding the user that a change has been made to the view. Users can save this view for personal use or publish the view, making it accessible to other users.
If you’ve come this far in your D365 reading and still can’t stop thinking about Butternut Squash Soup, I recommend you try Danielle’s PALEO BUTTERNUT SQUASH SOUP WITH POMEGRANATE – it really looks delicious. #D365forButternutSquashSoup
So-crates, from Bill & Ted’s Excellent Adventure (1989)
“Let him who would move the world first move himself” – Socrates
Rounding out this personalization series, let’s take a look at the move and hide features.
I think these two features should be more widely utilized. D365 forms are designed for multiple personas / business processes. Decluttering forms for specific personas by moving less frequently used fields farther down the form or hiding them completely is an easy way to increase day-to-day efficiency, as well as simplify the training/change-management process.
Move a Field
Open the personalization toolbar Ctrl+Shift+P and select the Move button. Click on the Field, Field Group, or FastTab to be moved. From there, drag with the cursor or use the Arrow Keys to indicate where the form element should go. I find using the arrows a bit easier to control. An orange indicator line displays where the form indicator will go, and Enter will set the field in its new location. Close the personalization toolbar to view the result.
Moving the Responsible field group to the end of the General FastTab. Note the highlighted indicator line.
Result after closing the personalization toolbar.
Move can also be used to adjust the column order on a listpage.
Hide a Field
The hide feature works similar to the move feature. Hide can be applied to Fields, Field Groups, or FastTabs, as well as Tabs, Groups, or Buttons in the form’s header ribbon. It can be done through the personalization toolbar, or by right-clicking, selecting personalize, and then selecting Hide for the desired form element.
Right-click, Personalize, and Hide the Project team and scheduling FastTab.
No, the fields aren’t lost forever. Using the Personalization toolbar, click on the hide button to reveal which form elements have been hidden through personalization.
Some parts of the Projects form are hidden, but which ones? I don’t have a photographic memory.
Open Personalization toolbar and selecting Hide What was hidden is now revealed.
In 1955, Bernard Heuvelmans created a new field: Cryptozoology – the study of imaginary animals.
Create a New Field
As mentioned previously, when adding a field through personalization users also have the option to create a new field. After opening the personalization toolbar, selecting Add a field, and choosing the desired location for the added field, users are prompted to select from an existing field or Create new field.
In the Create new field area, users can define
The table where the new field should be added
The new field’s prefix (all fields added through personalization end in _Custom)
The field’s data type (Text, Number, Decimal, DateTime, Date, Picklist, Checkbox)
The field’s help text (what displays when the hovering the cursor over the field)
Example of new Picklist field creation
Example of new Checkbox field creation
Example of new Example fields displayed on Customer form
Additional Considerations:
In a few clicks, a new field can be created and added to a form – saving hours of developer time, code promotion, and testing over the standard approach of doing this through development. That’s good. But with the ease of creating a new field, don’t neglect thinking through the below – which could save headaches associated with implementing any new field – whether through personalization or development.
Access
Who needs to see or edit the new field? From what forms? Personalization can add the new field to the saved view, but the new view(s) will need to be published to the desired users or roles.
Data Migration
How will the current data for this field be loaded in D365? Who will do it? In System administration, there is a form to manage Custom fields. Here, a custom field can be added to a data entity for data migration. The Custom fields form is also where field values like picklist options or the length of a text field can be updated.
Reporting
Does this custom field need to be added to any reports? It is easy to add a custom field to a listpage using personalizations. Visibility on the listpage is frequently enough, and Ctrl+Shift+E can be used to quickly export listpages to excel.
Custom Example field on Customer Listpage
If the new field needs to be added to a formatted report, or to a data model for consumption in PowerBI or another reporting solution, you may need additional developer assistance.
Testing
One last thought about creating a new field through personalization – it doesn’t follow the standard QA->UAT->Production path of regular code promotion. A new field can be created as a test in a test environment, but at showtime a user has to create the new field directly in the production environment. This is probably fine for fields that are “just extra attributes”, but probably not fine for fields related to a company’s core business. If additional methods or logic need to be applied to a field, it is probably better the field be created through development.
“When he went out to plough his fields…his heart would fill with joy.”
How Much Land Does a Man Need? | Leo Tolstoy
D365 contains thousands of related tables with an almost innumerable number of fields – some say D365 has almost as many fields as this blog has fans. But sometimes a user just needs one more field.
Users access this table data through forms. Frequently, a form’s standard view will not contain every single field of related table data. Did you know the customer table (CustTable) has 203 different fields?Add a field allows additional table information to be presented on a form.
Add a Field
Use Ctrl+Shift+P to bring up the Personalization Toolbar and click on Add a field. Once Add a field is selected, click on the part of the form where the new field should go.
A new “Add columns” area will pop up on the right allowing the user to select which field (or fields) to bring into the form. Did you know that 3 of the 203 fields on the Customer Table are notes fields?
The selected field(s) will now display on the form.
If the field isn’t positioned quite where intended, the Move button ca be used to fine-tune the location of the new field.
Add a Field, Again!
It is generally bad database design to represent the same field twice on the same table, but not necessarily bad form design. For example, it may make sense to have customer currency in the sales demographics FastTab, and terms of payment in the Payment defaults FastTab. It might also be helpful to have this information closer to the top of the form. Add a field could be used to bring those fields onto the general FastTab in addition to their standard locations.
Add a Custom Field
Observant readers will notice the “Add columns” area also includes a “Create new field” button. Links below are included to outline that functionality – I’ll add my own opinions on the pros and cons of adding custom fields through personalization in a later post.